Contents
Generic Integration Framework to Support ASB Interface
Azure Service Bus (ASB) is a fully managed enterprise integration message broker. Data is transferred between different applications and services using messages. The ICI-ASB adapter considers the approach based on REST and OData principles that exposes a uniform, stateless interface which communicates using HTTP(S) and JSON payloads.
Configuring ASB adapter to load Masterdata
The ICI support for generic integration provides the ability to synchronize ICI Masterdata tables using the input from ASB. Through a technical configuration, you can specify the attributes to be used for this generic integration.
Create Masterdata Contract Type
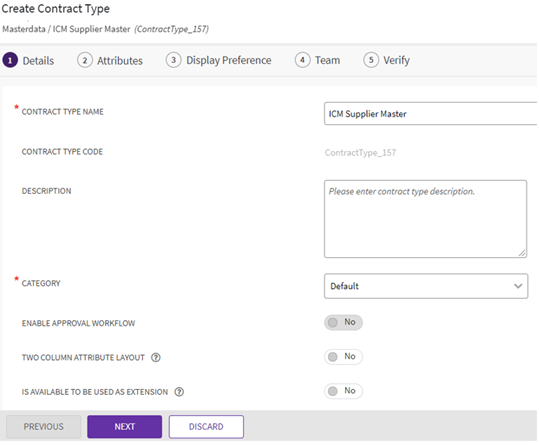
To enable synchronization between ICI and ASB, a Masterdata Contract Type should first be configured in ICI, with specific attributes for the integration. To create a Masterdata Contract Type:
- Click Contract Type menu from the Configure tile. The Select Contract Type page opens.
- Select Masterdata.
- Click the Next button. The Create Contract Type page opens.
- The Create Contract Type page has the following sections:
- Details: Enter the Contract Type Name
- Attributes: Select the Attributes for the Masterdata Contract Type
- Display Preference: Select Attributes to be displayed in the Agreement Tile View
- Team: Select the Team
- Verify: Verify the details in preview mode and click Create.
Client App Cross Reference
The Client App Cross Reference mapping maps ICI entities (for example, ICI attributes) to client app entities.
- Navigate to the Create Masterdata page in ICI. This page contains the following tabs:
Masterdata Details
1. Select the Category from the drop-down. For example, Default.
2. Select the Masterdata Contract Type.
3. Click Next. The Attributes page opens.
Attributes
- Enter the relevant attribute values. For example, enter ICI Entity Name as ICISupplierMaster and Client Entity Name as SupplierMaster. The Payload Type can be selected as JSON.
- Click Save to save the entity mapping.
Client App Entity Mapping
The Client App Entity Mapping maps ICI attributes (for example, attribute names used in Supplier Master) to attributes in the file uploaded through ASB.
- Navigate to theCreate Masterdata page in ICI. This page contains the following tabs:
Masterdata Details
- Select the Category from the drop-down. For example, Default.
- Select the Masterdata Contract Type.
- Click Next. The Attributes page opens.
Attributes
- Enter the relevant attribute values. For example, enter ICI Entity Name as ICISupplierMaster and Client Entity Name as SupplierMaster.
To create mapping using ASB, select Messaging in the Integration Mode drop-down. The Client Name selected must be GenerICIntegration.
In case of lookup and non-lookup attributes: The ICI Relationship Key should be set for lookup attributes and kept blank for non-lookup attributes. The Relationship Key framing should be <Master Contract Type Name> Double Underscore<ICI Attribute Name>. For example, in case of Supplier Master the ICI attribute name will be ICISupplierCountry and the Masterdata Contract Type for this attribute will be ICICountryMaster. Hence, relationship key will be ICICountryMaster__ICISupplierCountry.
- Click CREATE to save the entity mapping.
Using ASB Adapter to load/publish Masterdata
Download Payload
- Navigate to the Masterdata page in ICI.
- Click the View Record icon next to the Client App Cross Reference entity you have created. The Masterdata Details page opens.
- Click the DOWNLOAD PAYLOAD button to download a template for the Masterdata.
Note: The file format of the template will be according to the Payload Type selected in the attributes of the Client App Cross Reference entity.
- Open the downloaded JSON file. This file will be used by third-party systems to push data to the ASB adapter.
For Scheduled updation:
For EventBased updation:
Publish Payload
- Click PUBLISH PAYLOAD The file will be published.
A notification is displayed once the Payload is published successfully.
Using ASB Adapter to load/publish Transaction Data
Updating Transaction Data
To update transaction data from ICI using generic integration framework:
- Edit the agreement in ICI with the desired values.
- Click Update.
Note: For transaction data outbound, it is mandatory to select Data Flow Type as ICI to Client in the Client App Entity Mapping. The workflow action selected in Publish Transaction Data in Client App Cross Reference Mapping is the event at which transaction data will be updated. For example, if the values selected in this field are Approved and Updated, then the transaction data will be updated when these actions are taken on the agreement.
Checking Data in Service Bus Explorer
To validate the data in the Service Bus Explorer:
- Open Service Bus Explorer and go to the Service Bus Namespace.
- Go to the generICIntegrationoutbound topic. Right-click and select Refresh Subscription from the drop-down.
- Click Messages. The Retrieve messages from subscription window opens.
- Select Peek radio button in the Receive Mode section.
- Click Ok.
The updated values are displayed in the Message Text.
- Check the Notifications Dashboard in ICI to view the success, failure and update notifications for outbound transaction data.
The same steps can be followed to create:
- Contract Requests with Associations - Inbound
- Associations for Agreements - Inbound
- Amendments with Associations - Outbound
Related Topics: Agreement Management | Integrations | Salesforce | Using Adobe Sign | Using DocuSign | Using Namirial eSignAnyWhere | Generic Integration Framework to Support SFTP Interface | Release_Notes |


