| (29 intermediate revisions by 6 users not shown) | |||
| Line 1: | Line 1: | ||
= Managing User Groups = | = Managing User Groups = | ||
| + | |||
| + | |||
== Search a User Group == | == Search a User Group == | ||
| − | In | + | In ICI, you can search an existing user groups for multiple reasons such as: |
*To know the details of the user groups | *To know the details of the user groups | ||
| Line 13: | Line 15: | ||
Here is the process to search for an existing user groups | Here is the process to search for an existing user groups | ||
| − | In | + | In ICI, you can use various options given below, including the dynamic search feature, to find the desired user group. |
| − | + | ||
| − | + | ||
| − | + | ||
| − | + | ||
| − | + | <br/> 1. '''Click''' the User Groups tile on the "Admin" page. The "User Groups" page that lists the existing user groups appears. | |
| + | <div class="image-green-border">[[File:8.0-Managing-User-Groups-Menu.png|720px|8.0-Managing-User-Groups-Menu.png]]</div> | ||
| + | 2. Search for a specific user group by using the "Refine View" collapsible left pane with the following options: | ||
| + | *'''Click''' the "Select Field" list under "Categories", and then select the appropriate item. Search results relevant to the item are displayed with a number in the bracket.<br/> The number denotes the number of user groups that meet the search criteria. You can further refine the search using "Custom Keyword" section. | ||
| + | <div class="image-green-border">[[File:8.0-Managing-User-Groups-Search.png|720px]]</div> | ||
3. '''Click''' the box to select specific item. A list of user groups relevant to the item is displayed. | 3. '''Click''' the box to select specific item. A list of user groups relevant to the item is displayed. | ||
| − | *To narrow your search further, type relevant keyword in the | + | *To narrow your search further, type relevant keyword in the Custom Keyword box, and '''click''' Apply. |
Alternatively, type the keywords in the box provided above the list of user groups. A list of relevant user groups is displayed.<br/> | Alternatively, type the keywords in the box provided above the list of user groups. A list of relevant user groups is displayed.<br/> | ||
| Line 51: | Line 53: | ||
'''Viewing the saved search terms'''<br/> View your saved search terms with the following: | '''Viewing the saved search terms'''<br/> View your saved search terms with the following: | ||
| − | *In the More Searches box, select your saved search, and '''click''' the | + | *In the More Searches box, select your saved search, and '''click''' the "Add to Favorites" icon to mark the search term as favorite. |
| − | *You can find your marked favorites below the tiles. | + | *You can find your marked favorites below the tiles. |
| + | |||
== Create a User Group == | == Create a User Group == | ||
| − | In | + | In ICI, you can create a group of users called a user group. |
To create a user group: | To create a user group: | ||
| − | 1. '''Click''' | + | 1. '''Click''' "User Groups"''' '''under the "Admin" tile. The User Groups page opens. |
| − | 2. '''Click''' | + | 2. '''Click''' "Create User Groups". The "Create User Groups" page opens. |
| − | <div class="image-green-border">[[File: | + | <div class="image-green-border">[[File:8.0-Managing-User-Groups-Create1.png|400px|8.0-Managing-User-Groups-Create1.png]]</div> |
| − | 3. On the | + | 3. On the "Details" tab: |
| − | a. '''Type''' a name for the user group that you want to create in the | + | a. '''Type''' a name for the user group that you want to create in the Name box. |
| − | b. '''Type''' the description for the user group in the | + | b. '''Type''' the description for the user group in the Description box, and then '''click''' Next. The Users tab appears. |
| − | 4. '''Click''' the Add User icon | + | 4. '''Click''' the Add User icon in the Users tab'''. '''The "Add User" dialog box appears. |
| − | a. Select appropriate user as a part of the user group you are creating. Alternatively, in the Search User box, type the name of the required user, and '''click''' the | + | a. Select appropriate user as a part of the user group you are creating. Alternatively, in the Search User box, type the name of the required user, and '''click''' the Search icon. |
Use the arrows to find the required user. | Use the arrows to find the required user. | ||
| − | b. '''Click | + | b. '''Click''' Add to add the user. The user that you have selected appears in the "Users tab. |
| − | 5. '''Click | + | 5. '''Click''' Next. The Verify tab appears. |
| − | 6. '''Verify''' the details you have entered On the | + | 6. '''Verify''' the details you have entered On the Verify tab, and then '''click''' Save. |
| − | The user group that you have just created appears on the | + | The user group that you have just created appears on the User Group page. |
| − | + | ||
| − | + | ||
== View and Edit User Roles == | == View and Edit User Roles == | ||
| − | Every user has a role in | + | Every user has a role in ICI. Administrator can edit the user role as and when required. |
To view and edit a user role: | To view and edit a user role: | ||
| − | 1. | + | 1. '''Click''' User Groups under the "Admin" tile and then '''click '''"User Groups" option. |
| + | |||
| + | 2. On the User Groups page, '''click''' the User Roles option. The User Role page displays the user roles in the system. | ||
| + | <div class="image-green-border">3. '''Click''' Edit icon. The Edit dialog box appears, displaying the Role and Display Name.</div> <div class="image-green-border"> </div> <div class="note-box">'''Note''': Every role must have a unique display name. If you type the same display name for two roles, the Please enter unique role display name message appears.</div> | ||
| + | 4. '''Edit '''the display name, and '''click''' Save. | ||
| + | <div class="image-green-border">[[File:MUGP4.png|650px|MUGP4.png]]</div> | ||
| + | |||
| − | |||
| − | |||
| − | |||
| − | |||
| − | |||
| − | |||
== Role-Action Mapping == | == Role-Action Mapping == | ||
| − | Using this feature, you can map system action ( Approve, Reject, Delete, and so on) to | + | Using this feature, you can map system action ( Approve, Reject, Delete, and so on) to ICI user roles (Primary owner, Approver, Reviewer, and so on), for a specific agreement entity (Templates, Clauses, Requests, Agreements). |
To view user role action mapping: | To view user role action mapping: | ||
| − | 1. '''Click''' | + | 1. '''Click''' "User Groups"''' '''on the "Admin" tile or menu on the top. |
| − | + | <div class="image-green-border">[[File:8.0-Managing-User-Groups-RoleActionMapping1.png|400px|8.0-Managing-User-Groups-RoleActionMapping1.png]]</div> | |
| − | 2. '''Click''' | + | 2. '''Click''' "Role-Action Mapping". The "Role-Action Mapping" page opens. |
| − | + | <div class="image-green-border">[[File:8.0-Managing-User-Groups-RoleActionMapping2.png|720px|8.0-Managing-User-Groups-RoleActionMapping2.png]]</div> | |
| − | 3. In the | + | 3. In the Select Entity list, '''select''' one of the following entities for which you want to view the role-action mapping. |
*Template | *Template | ||
| Line 124: | Line 125: | ||
*System Action: Displays possible action that you can take on the state of the entity. | *System Action: Displays possible action that you can take on the state of the entity. | ||
*Action Display Name: Displays the name of the button that will appear to a particular user in a given state. | *Action Display Name: Displays the name of the button that will appear to a particular user in a given state. | ||
| − | *Roles: The user roles that have a will view the button (mentioned in the | + | *Roles: The user roles that have a will view the button (mentioned in the Action Display Name column). |
| − | <div class="image-green-border"> | + | <div class="image-green-border"> </div> |
=== Editing the Role Action mapping === | === Editing the Role Action mapping === | ||
To edit the role-action mapping: | To edit the role-action mapping: | ||
| − | 1. '''Select''' one of the following entities for which you want to edit the role-action mapping on the | + | 1. '''Select''' one of the following entities for which you want to edit the role-action mapping on the Role-Action Mapping page, in the Select Entity list. |
*Template | *Template | ||
| Line 141: | Line 142: | ||
The role-action mapping table for the selected entity appears. | The role-action mapping table for the selected entity appears. | ||
| − | 2. '''Click''' the | + | 2. '''Click''' the Edit icon. The Edit window appears. |
3. '''Edit''' the role actions by doing either of the following. | 3. '''Edit''' the role actions by doing either of the following. | ||
| − | *'''Edit''' the | + | *'''Edit''' the Action Display Name. |
*'''Select''' user roles in the left pane; and '''click''' the relative arrow to add them to the right pane. | *'''Select''' user roles in the left pane; and '''click''' the relative arrow to add them to the right pane. | ||
| − | <div class="image-green-border">[[File: | + | <div class="image-green-border">[[File:MUGP6.png|650px|MUGP6.png]]</div> |
| − | 4. '''Click | + | 4. '''Click''' Save. The new role appears under the Role column for the selected entity. |
| − | <div class="note-box">'''Note''': Role-action mapping cannot be edited for | + | <div class="note-box">'''Note''': Role-action mapping cannot be edited for Approve or Reject actions in the Waiting for Approval state as the approvers for these actions are either added by the primary owner or by a rule. However you can edit the Action Display Name.</div> |
=== Role Action Mapping to Download Supporting Documents for Contract Requests === | === Role Action Mapping to Download Supporting Documents for Contract Requests === | ||
| − | To configure this capability to download supporting documents for Contract Requests using Role-Action Mapping: <br/> 1. '''Click''' the | + | To configure this capability to download supporting documents for Contract Requests using Role-Action Mapping: <br/> 1. '''Click''' the "Admin" tile on the Dashboard.<br/> 2. '''Click''' the User Groups tile.<br/> 3. '''Click''' the Role-Action Mapping tile.<br/> 4. '''Select''' Contract Request from theSelect Entity drop-down.<br/> 5. '''Click''' the Edit button next to the Contract Request whose Role you want to define. |
| − | + | ||
| − | 6. '''Select''' the Role from the list on the left hand side and '''click '''the arrow button to move it to the right hand side. For example, '' | + | 6. '''Select''' the Role from the list on the left hand side and '''click '''the arrow button to move it to the right hand side. For example, Observer.''' ''' |
| + | |||
| + | 7. '''Enter''' the Action Display Name. For example, Download All. | ||
| + | |||
| + | 8. '''Click''' the Save button'''. '''The action and role for the user will be displayed in the Action Display Name and Roles column respectively. For example, Download All and Observer. | ||
| − | |||
| − | |||
| − | |||
| − | |||
== Attribute Group Privileges == | == Attribute Group Privileges == | ||
| − | In | + | In ICI, user can also manage the Attribute group privileges through the UI. This is required when you want to restrict an Attribute Group access for any specific role. By default all the users can access the Contract or Agreement, so it gives the privilege to restrict the access of the specific roles for selected Attributes group in selected states. |
| − | For example, Agreement Attribute section has different number of Attribute groups, now if the User (Legal Team Manager) is restricted to access Finance group in | + | For example, Agreement Attribute section has different number of Attribute groups, now if the User (Legal Team Manager) is restricted to access Finance group in Draft state, the user will not be able to see Finance group when logged in, in selected state. Other than Draft state the user will be able to see Finance group in other states. |
To restrict the access of any specific group of Attribute, for any user, in the Agreement: | To restrict the access of any specific group of Attribute, for any user, in the Agreement: | ||
| − | 1. '''Click''' the | + | 1. '''Click''' the Admin tile on My Dashboard, and then '''click''' User Groups tile. |
| − | 2. '''Click | + | 2. '''Click''' Attribute Group Privileges tile. The Attribute Group Privileges page opens. |
| − | + | ||
| − | + | ||
| − | + | ||
| − | + | ||
| − | + | ||
| − | + | ||
| + | 3. '''Select '''the appropriate Contract Type name in the Select Contract Type field. | ||
| + | <div class="image-green-border">4. '''Click''' Add, An Add dialog box appears which consists of following fields:</div> <div class="image-green-border"> </div> <div class="image-green-border">[[File:MUGP10.PNG|650px|MUGP10.PNG]]</div> <div class="image-green-border"> </div> | ||
*Contract Type: will display the same name which was selected earlier. | *Contract Type: will display the same name which was selected earlier. | ||
| − | *Attribute Group: '''select''' the group of | + | *Attribute Group: '''select''' the group of Contract/Agreement for which you want the access of the specific user role to be restricted. |
*Select States:'''select''' one or more states of the Agreement in which you want the access of the specific user role to be restricted. | *Select States:'''select''' one or more states of the Agreement in which you want the access of the specific user role to be restricted. | ||
*Select Roles: '''select''' one or more roles for whom the access will be restricted. | *Select Roles: '''select''' one or more roles for whom the access will be restricted. | ||
| − | 5. '''Click | + | 5. '''Click''' Save. The Mapping added successfully message is displayed. The added mapping will be displayed in the table on Attribute Group Privileges page. |
| + | |||
| + | 6. You can also copy the privileges of one Contract Type to other. '''Select '''the Contract Type name and '''click '''Copy. The Copy dialog box appears. It consists of Attribute Group field to select the attribute group, so that all the Contract types consisting of that specific attribute group should get listed under Copy To. | ||
| + | |||
| + | 7. '''Move''' the Contract Types you want to get copied in other box. | ||
| + | |||
| + | 8. '''Click '''Save. | ||
| + | |||
| + | | ||
| + | |||
| + | == Ability to configure and control access privileges based on the custom user role == | ||
| − | + | ICI now provides the capability to define new roles for agreements and amendments as per business requirements and control their access using existing ICI functionalities (such as Role Action Mapping, Attribute Group Privileges and Security Groups). The custom roles are added to the ICI through technical configuration. | |
| − | + | With custom roles, users can: | |
| − | + | *Control navigation pane access for agreement and associated documents. | |
| + | *Control group access privileges and team actions. | ||
| + | *Configure event rule and notification rule. | ||
| + | <div class="note-box">Note: The custom roles do not support the workflow actions dependent upon other action requests (For example, Approve and Reject for Send for Approval action).</div> | ||
== SLA Matrix == | == SLA Matrix == | ||
| − | The SLA Matrix tile in the | + | The SLA Matrix tile in the User Groups section of the User Administration tile captures the Due Date and Time for a task to be fulfilled so that they can comply with the Service Level Agreement (SLA) requirements of the organization. For most organizations, the Due Date is critical for completion of tasks by a set date and mandatory for Approvers/Action users, this feature is imperative for tasks making the users aware of deadlines and close tasks accordingly. |
From the SLA Matrix tile, you can: | From the SLA Matrix tile, you can: | ||
| Line 200: | Line 210: | ||
*Drive Notifications for Pending and Overdue Tasks | *Drive Notifications for Pending and Overdue Tasks | ||
| − | In | + | In ICI, tasks are generated for Approval, Deviation Approval, Internal Signature, External Signature, Internal Review, External Review, Contract Request Submitted, so the Administrator can configure SLA for these actions only based on Contract type. This functionality of determining the Due Date and Time for overdue tasks is available for the following entities that can be selected from the Select Entity Name drop-down list: |
| − | + | ||
| − | This functionality of determining the Due Date and Time for overdue tasks is available for the following entities that can be selected from the Select Entity Name drop-down list: | + | |
*Agreement | *Agreement | ||
| Line 212: | Line 220: | ||
*Masterdata | *Masterdata | ||
*User Information | *User Information | ||
| − | <div class="image-green-border">[[File: | + | <div class="image-green-border">[[File:MUGP7.png|650px|MUGP7.png]]</div> <div class="image-green-border"> </div> <div class="image-green-border">The SLA Matrix tile displays the following columns on selecting an Entity from the Select Entity Name drop-down which contains a list of entities for which you have created a record: </div> |
| − | The SLA Matrix tile displays the following columns on selecting an Entity from the Select Entity Name drop-down which contains a list of entities for which you have created a record: | + | *Entity Name: displays the entities for which an SLA has been defined for the selected entity. For example, Agreement. |
| − | + | *System Action: displays the action for which an SLA has been defined for the selected entity. For example, Approval, Internal Signature, Deviation Approval, etc. | |
| − | * | + | *SLA: displays the period of the SLA. |
| − | * | + | |
| − | * | + | |
<div class="note-box">'''Note''': By default, the SLA is calculated in days, but it can be configured to be calculated in hours.</div> | <div class="note-box">'''Note''': By default, the SLA is calculated in days, but it can be configured to be calculated in hours.</div> | ||
| − | * | + | *First Reminder Starts: displays when the first reminder for the SLA will be sent before the due date. |
Each of the columns can be filtered and sorted as required. | Each of the columns can be filtered and sorted as required. | ||
| − | |||
| − | |||
| − | + | The Service Level Agreement (SLA) for a particular entity can be calculated from the SLA Matrix tile in the User Administration section. You can define SLAs (due dates applicable to tasks) so that users are aware of time to take these tasks to closure.<br/> To define an SLA for an entity: <br/> 1. '''Click '''the "Admin" tile.<br/> 2. '''Click''' the SLA Matrix tile.<br/> 3. '''Click''' the Define SLA button. This opens the Define SLA window. | |
| − | *'''Select''' the | + | On the Define SLA window: |
| − | *From the | + | |
| − | *'''Enter''' the | + | *'''Select''' the Entity Name from the drop-down list that has a list of all entities and Contract Types in ICI. |
| + | *From the Select Action drop-down, '''select''' an action to define an SLA for the selected entity. The available options are Termination Review, Review, Approval, Deviation Approval, External Signature, Internal Signature and Contract Request Submitted. You can select one or more action as per your requirement. For example, Review and Approve. | ||
| + | *'''Enter''' the SLA (days). For example, 5 days. | ||
*'''Note: '''By default, the SLA is calculated in days, however, it can be configured to be calculated in hours. | *'''Note: '''By default, the SLA is calculated in days, however, it can be configured to be calculated in hours. | ||
| − | *'''Enter''' when you want the | + | *'''Enter''' when you want the First Reminder Starts (days) to be sent before the due date. The Scheduler Task is run on a daily basis till the task is completed. For example, 2 days. |
| − | <div class="image-green-border">[[File: | + | <div class="image-green-border">[[File:MUGP8.png|720px|MUGP8.png]]</div> |
| − | *'''Click | + | *'''Click '''Save to define your SLA. The SLA for your selected entity will be added to the list of records on the SLA Matrix page. |
Based on the SLA defined for a particular entity, the Task Grid will display it with the Due Date so that the user can easily identify the tasks that are pending action. | Based on the SLA defined for a particular entity, the Task Grid will display it with the Due Date so that the user can easily identify the tasks that are pending action. | ||
| − | |||
| − | |||
| − | Clicking the | + | The Due Date of the task will be displayed in red for tasks that are overdue or the due date is prior to today. On the other hand, if the due date is ahead of today, then it will be displayed in black. Actual due date calculation is for new tasks, delegated tasks and reassigned tasks. The due date is auto calculated based on the SLA during task creation. When multiple SLA’s are available, ICI considers the lower level first. The field Is Overdue filters tasks so that you can check for ones that are overdue. If ICI does not find a Due Date or Time, then those fields do not display any value. |
| − | <div class="image-green-border">[[File: | + | |
| + | Clicking the Notifications tile on the Dashboard opens the Notifications Dashboard. You can create an SLA Reminder in the Notifications Dashboard. This can be customized as per your requirements. In the example below, the SLA Reminder is created for overdue tasks and pending tasks. <br/> The user gets an email notification daily for overdue and pending tasks defined in the SLA till the task is completed. The ICI user interface will also display the list of tasks overdue or pending in the respective sections – Task Overdue Notification and Task Pending Notification. | ||
| + | <div class="image-green-border">[[File:MUGP9.png|720px|MUGP9.png]]</div> | ||
You can set up a reminder for pending tasks by entering the days when you want the first reminder till the task is completed to ensure compliance with the organization’s needs. | You can set up a reminder for pending tasks by entering the days when you want the first reminder till the task is completed to ensure compliance with the organization’s needs. | ||
| − | |||
| − | |||
| − | You can delete a single record from the '' | + | If the First Reminder Starts is 2 days, then the reminder notification for that task will be sent 2 days prior to the due date. For example, you enter that the First Reminder Starts as 2 days on December 07, 2018, then the first reminder and notification for actions pending will first be sent on December 05, 2018 till December 07, 2018 and will be listed in the Tasks Pending Notifications section. On December 08, 2018, when the due date is crossed, then a reminder and the overdue notification will be sent daily till the task is fulfilled and the task will then be listed in the Task Overdue Notification section. This notification will be sent daily till it is fulfilled. |
| + | |||
| + | You can delete a single record from the Grid list. To delete a record from the list: | ||
| + | |||
| + | 1.''' Select''' an entity to delete from the Select Entity drop-down list. <br/> 2. '''Click''' the Delete icon next to the entity you want to delete. This opens a window to confirm you want to delete the record. | ||
| + | |||
| + | 3. '''Click''' Ok if you want to delete the record. An SLA Mapping Deleted Successfully! message is displayed. | ||
| + | |||
| + | You can edit a single record from the Grid list. | ||
| − | 1.''' | + | To edit a record from the list:<br/> 1. '''Select''' an entity to edit from the Select Entity drop-down list.<br/> 2. '''Click''' the Edit icon next to the entity you want to edit. This opens the Edit SLA window. The Entity Name and the Select Action fields are auto populated. |
| − | + | ||
| − | + | ||
| − | + | ||
| − | + | ||
| − | + | 3. '''Edit''' the values in the SLA (days) or/and First Reminder Starts (days) fields. | |
| − | + | <div class="image-green-border">4.''' Click''' Update. An SLA Updated Successfully! message is displayed.</div> <div class="image-green-border"> </div> <div class="image-green-border"> </div> <div class="note-box">'''Note: '''You can create records for multiple actions, but you can add and delete a record only for individual actions.</div> | |
| − | 3. '''Edit''' the values in the | + | |
| − | <div class="image-green-border" | + | |
| | ||
| Line 263: | Line 269: | ||
| | ||
| − | '''Related Topics: '''[[Agreement_Management|Agreement Management]] | [[Managing_Organization|Managing Organization]] | [[Managing_Users|Managing Users]] | [[Managing_Security_Groups|Managing Security Groups]] | [[Application_Settings|Application Settings]] | [[Notification_Settings|Notification Settings]] | [[Currencies|Currencies]] | [[Reasons|Reasons | + | '''Related Topics: '''[[Agreement_Management|Agreement Management]] | [[Managing_Organization|Managing Organization]] | [[Managing_Users|Managing Users]] | [[Managing_Security_Groups|Managing Security Groups]] | [[Application_Settings|Application Settings]] | [[Notification_Settings|Notification Settings]] | [[Currencies|Currencies]] | [[Reasons|Reasons]] | [[Search_Sync|Search Sync]] | [[Legacy_Upload|Legacy Upload]] | |
Latest revision as of 10:19, 9 June 2022
Contents
Managing User Groups
Search a User Group
In ICI, you can search an existing user groups for multiple reasons such as:
- To know the details of the user groups
- To edit an existing user groups
You use multiple parameters to search a user groups.
Here is the process to search for an existing user groups
In ICI, you can use various options given below, including the dynamic search feature, to find the desired user group.
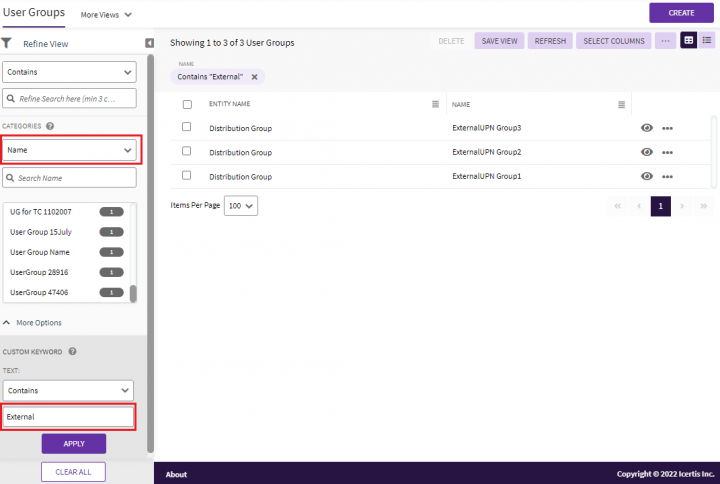
1. Click the User Groups tile on the "Admin" page. The "User Groups" page that lists the existing user groups appears.
2. Search for a specific user group by using the "Refine View" collapsible left pane with the following options:
- Click the "Select Field" list under "Categories", and then select the appropriate item. Search results relevant to the item are displayed with a number in the bracket.
The number denotes the number of user groups that meet the search criteria. You can further refine the search using "Custom Keyword" section.
3. Click the box to select specific item. A list of user groups relevant to the item is displayed.
- To narrow your search further, type relevant keyword in the Custom Keyword box, and click Apply.
Alternatively, type the keywords in the box provided above the list of user groups. A list of relevant user groups is displayed.
Enhancing your search
Narrow down your search by using any of the following methods:
| Field | Action |
|---|---|
| "..." | Type the search term in double quotation marks. It shows existing user groups that include the exact search term. |
| *...* | Type the search term in star characters. It shows existing user groups that include the exact search term. |
| *... | Add a Prefix * to the search term. It shows existing user groups that end with this term. |
| ...* | Add a Suffix * to the search term. It shows existing user groups that start with this term. |
Viewing the saved search terms
View your saved search terms with the following:
- In the More Searches box, select your saved search, and click the "Add to Favorites" icon to mark the search term as favorite.
- You can find your marked favorites below the tiles.
Create a User Group
In ICI, you can create a group of users called a user group.
To create a user group:
1. Click "User Groups" under the "Admin" tile. The User Groups page opens.
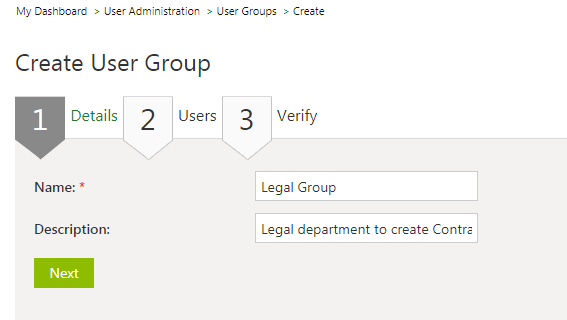
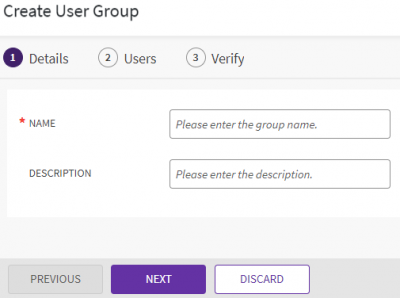
2. Click "Create User Groups". The "Create User Groups" page opens.
3. On the "Details" tab:
a. Type a name for the user group that you want to create in the Name box.
b. Type the description for the user group in the Description box, and then click Next. The Users tab appears.
4. Click the Add User icon in the Users tab. The "Add User" dialog box appears.
a. Select appropriate user as a part of the user group you are creating. Alternatively, in the Search User box, type the name of the required user, and click the Search icon.
Use the arrows to find the required user.
b. Click Add to add the user. The user that you have selected appears in the "Users tab.
5. Click Next. The Verify tab appears.
6. Verify the details you have entered On the Verify tab, and then click Save.
The user group that you have just created appears on the User Group page.
View and Edit User Roles
Every user has a role in ICI. Administrator can edit the user role as and when required.
To view and edit a user role:
1. Click User Groups under the "Admin" tile and then click "User Groups" option.
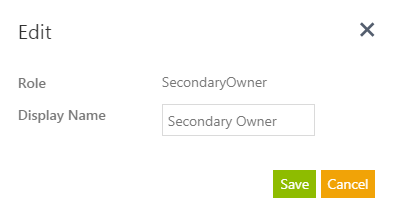
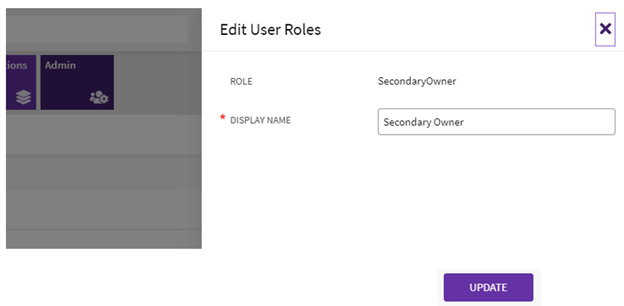
2. On the User Groups page, click the User Roles option. The User Role page displays the user roles in the system.
4. Edit the display name, and click Save.
Role-Action Mapping
Using this feature, you can map system action ( Approve, Reject, Delete, and so on) to ICI user roles (Primary owner, Approver, Reviewer, and so on), for a specific agreement entity (Templates, Clauses, Requests, Agreements).
To view user role action mapping:
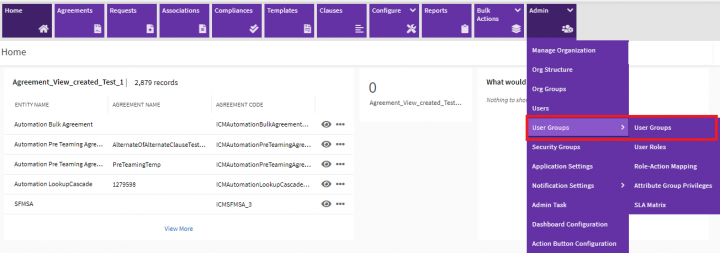
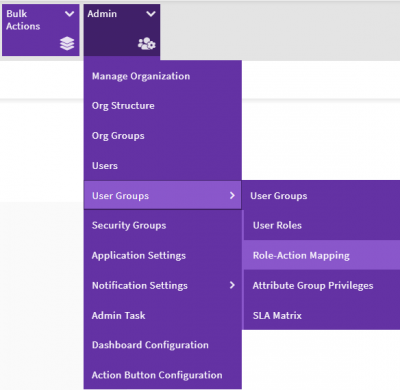
1. Click "User Groups" on the "Admin" tile or menu on the top.
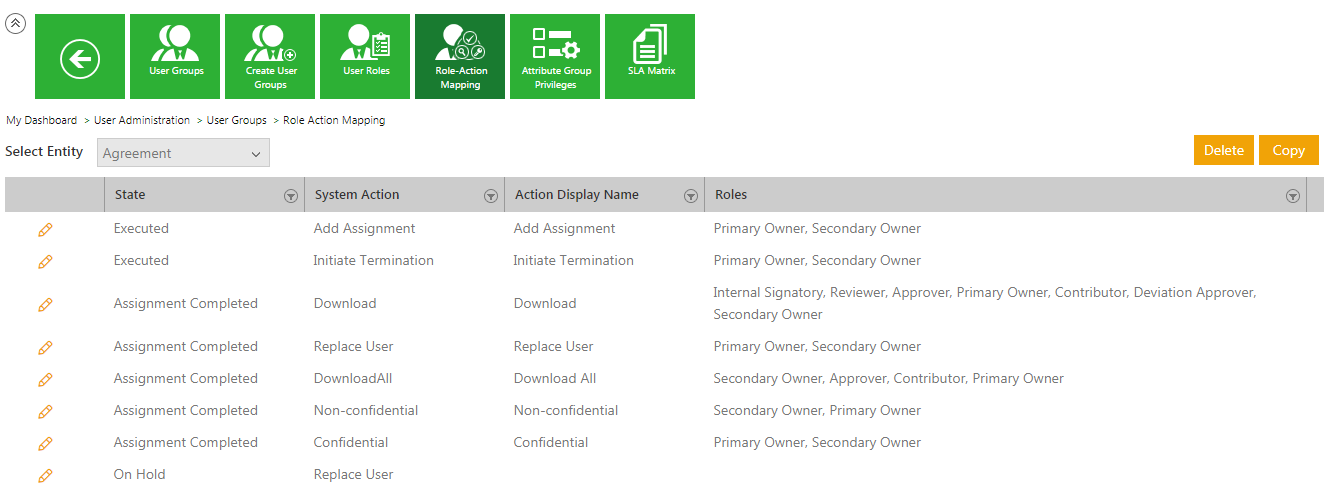
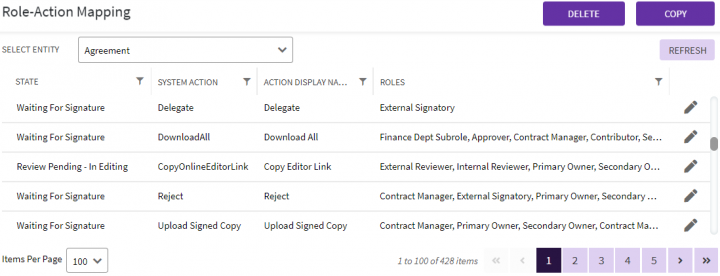
2. Click "Role-Action Mapping". The "Role-Action Mapping" page opens.
3. In the Select Entity list, select one of the following entities for which you want to view the role-action mapping.
- Template
- Clause
- Associated Document
- Contract Request
- Agreement
- Contract Type
The role-action mapping table for the selected entity appears, displaying the following columns:
- State: Displays the state of the entity.
- System Action: Displays possible action that you can take on the state of the entity.
- Action Display Name: Displays the name of the button that will appear to a particular user in a given state.
- Roles: The user roles that have a will view the button (mentioned in the Action Display Name column).
Editing the Role Action mapping
To edit the role-action mapping:
1. Select one of the following entities for which you want to edit the role-action mapping on the Role-Action Mapping page, in the Select Entity list.
- Template
- Clause
- Associated Document
- Contract Request
- Agreement
- Contract Type
The role-action mapping table for the selected entity appears.
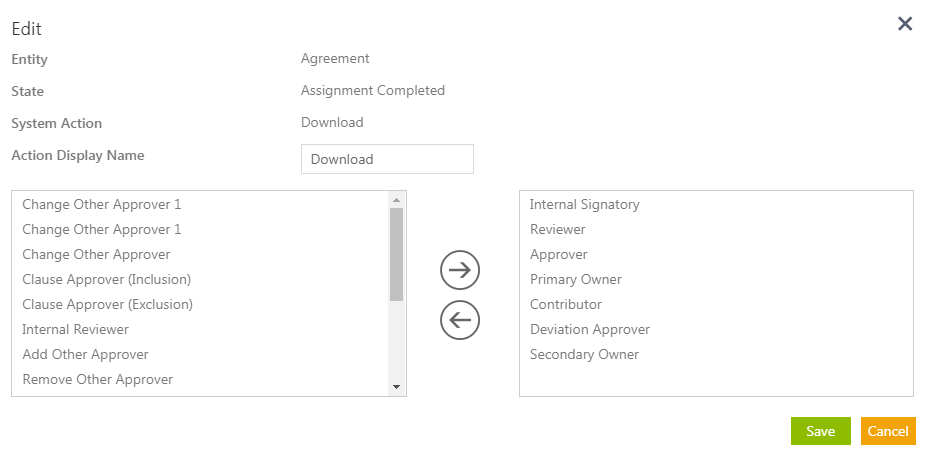
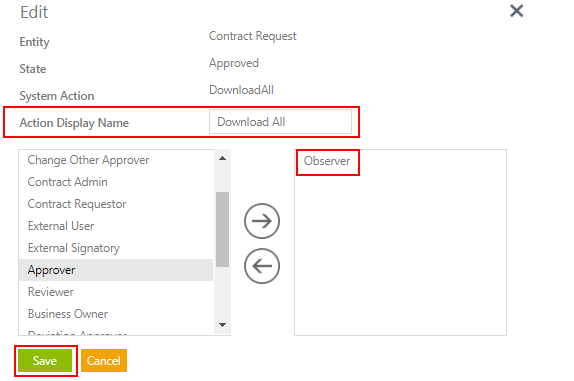
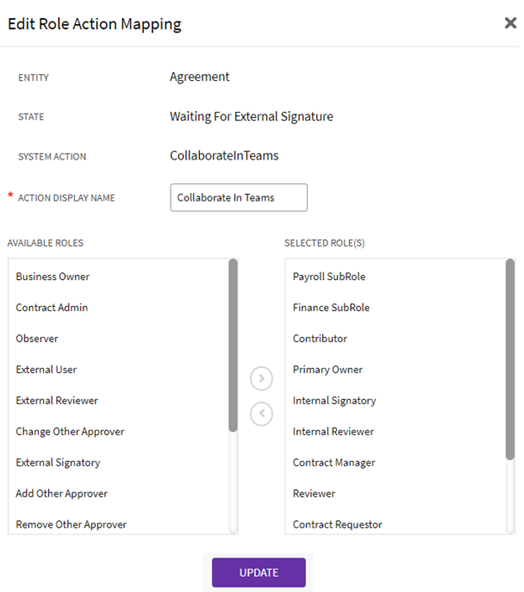
2. Click the Edit icon. The Edit window appears.
3. Edit the role actions by doing either of the following.
- Edit the Action Display Name.
- Select user roles in the left pane; and click the relative arrow to add them to the right pane.
4. Click Save. The new role appears under the Role column for the selected entity.
Role Action Mapping to Download Supporting Documents for Contract Requests
To configure this capability to download supporting documents for Contract Requests using Role-Action Mapping:
1. Click the "Admin" tile on the Dashboard.
2. Click the User Groups tile.
3. Click the Role-Action Mapping tile.
4. Select Contract Request from theSelect Entity drop-down.
5. Click the Edit button next to the Contract Request whose Role you want to define.
6. Select the Role from the list on the left hand side and click the arrow button to move it to the right hand side. For example, Observer.
7. Enter the Action Display Name. For example, Download All.
8. Click the Save button. The action and role for the user will be displayed in the Action Display Name and Roles column respectively. For example, Download All and Observer.
Attribute Group Privileges
In ICI, user can also manage the Attribute group privileges through the UI. This is required when you want to restrict an Attribute Group access for any specific role. By default all the users can access the Contract or Agreement, so it gives the privilege to restrict the access of the specific roles for selected Attributes group in selected states.
For example, Agreement Attribute section has different number of Attribute groups, now if the User (Legal Team Manager) is restricted to access Finance group in Draft state, the user will not be able to see Finance group when logged in, in selected state. Other than Draft state the user will be able to see Finance group in other states.
To restrict the access of any specific group of Attribute, for any user, in the Agreement:
1. Click the Admin tile on My Dashboard, and then click User Groups tile.
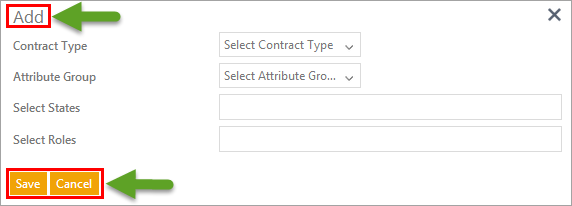
2. Click Attribute Group Privileges tile. The Attribute Group Privileges page opens.
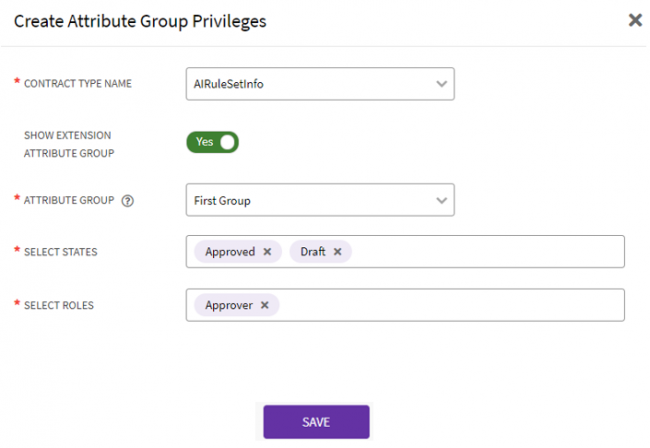
3. Select the appropriate Contract Type name in the Select Contract Type field.
- Contract Type: will display the same name which was selected earlier.
- Attribute Group: select the group of Contract/Agreement for which you want the access of the specific user role to be restricted.
- Select States:select one or more states of the Agreement in which you want the access of the specific user role to be restricted.
- Select Roles: select one or more roles for whom the access will be restricted.
5. Click Save. The Mapping added successfully message is displayed. The added mapping will be displayed in the table on Attribute Group Privileges page.
6. You can also copy the privileges of one Contract Type to other. Select the Contract Type name and click Copy. The Copy dialog box appears. It consists of Attribute Group field to select the attribute group, so that all the Contract types consisting of that specific attribute group should get listed under Copy To.
7. Move the Contract Types you want to get copied in other box.
8. Click Save.
Ability to configure and control access privileges based on the custom user role
ICI now provides the capability to define new roles for agreements and amendments as per business requirements and control their access using existing ICI functionalities (such as Role Action Mapping, Attribute Group Privileges and Security Groups). The custom roles are added to the ICI through technical configuration.
With custom roles, users can:
- Control navigation pane access for agreement and associated documents.
- Control group access privileges and team actions.
- Configure event rule and notification rule.
SLA Matrix
The SLA Matrix tile in the User Groups section of the User Administration tile captures the Due Date and Time for a task to be fulfilled so that they can comply with the Service Level Agreement (SLA) requirements of the organization. For most organizations, the Due Date is critical for completion of tasks by a set date and mandatory for Approvers/Action users, this feature is imperative for tasks making the users aware of deadlines and close tasks accordingly.
From the SLA Matrix tile, you can:
- Define SLAs for an Entity
- Drive Notifications for Pending and Overdue Tasks
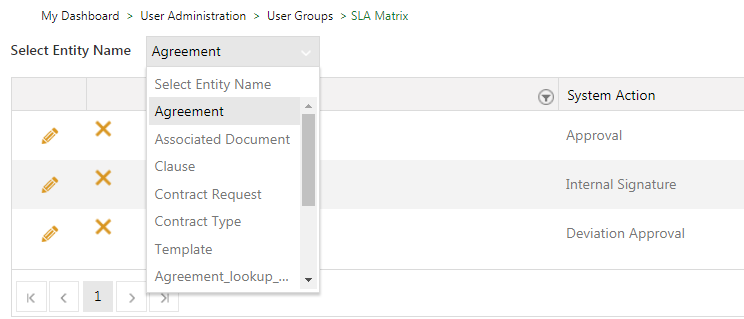
In ICI, tasks are generated for Approval, Deviation Approval, Internal Signature, External Signature, Internal Review, External Review, Contract Request Submitted, so the Administrator can configure SLA for these actions only based on Contract type. This functionality of determining the Due Date and Time for overdue tasks is available for the following entities that can be selected from the Select Entity Name drop-down list:
- Agreement
- Associated Document
- Clause
- Contract Request
- Contract Type
- Template
- Masterdata
- User Information
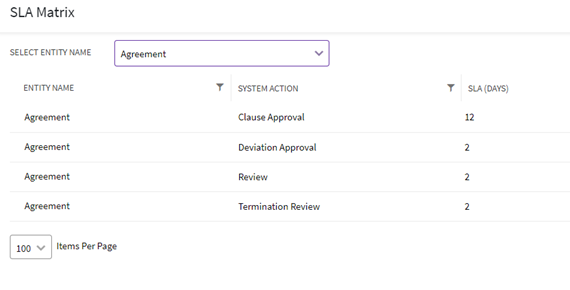
- Entity Name: displays the entities for which an SLA has been defined for the selected entity. For example, Agreement.
- System Action: displays the action for which an SLA has been defined for the selected entity. For example, Approval, Internal Signature, Deviation Approval, etc.
- SLA: displays the period of the SLA.
- First Reminder Starts: displays when the first reminder for the SLA will be sent before the due date.
Each of the columns can be filtered and sorted as required.
The Service Level Agreement (SLA) for a particular entity can be calculated from the SLA Matrix tile in the User Administration section. You can define SLAs (due dates applicable to tasks) so that users are aware of time to take these tasks to closure.
To define an SLA for an entity:
1. Click the "Admin" tile.
2. Click the SLA Matrix tile.
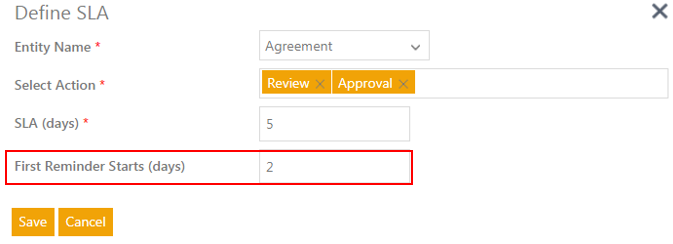
3. Click the Define SLA button. This opens the Define SLA window.
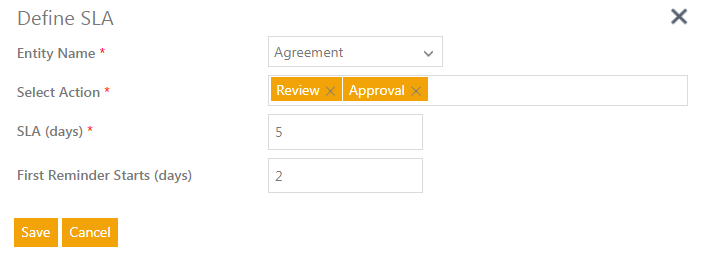
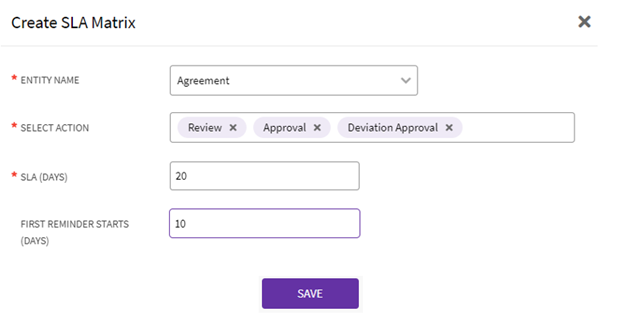
On the Define SLA window:
- Select the Entity Name from the drop-down list that has a list of all entities and Contract Types in ICI.
- From the Select Action drop-down, select an action to define an SLA for the selected entity. The available options are Termination Review, Review, Approval, Deviation Approval, External Signature, Internal Signature and Contract Request Submitted. You can select one or more action as per your requirement. For example, Review and Approve.
- Enter the SLA (days). For example, 5 days.
- Note: By default, the SLA is calculated in days, however, it can be configured to be calculated in hours.
- Enter when you want the First Reminder Starts (days) to be sent before the due date. The Scheduler Task is run on a daily basis till the task is completed. For example, 2 days.
- Click Save to define your SLA. The SLA for your selected entity will be added to the list of records on the SLA Matrix page.
Based on the SLA defined for a particular entity, the Task Grid will display it with the Due Date so that the user can easily identify the tasks that are pending action.
The Due Date of the task will be displayed in red for tasks that are overdue or the due date is prior to today. On the other hand, if the due date is ahead of today, then it will be displayed in black. Actual due date calculation is for new tasks, delegated tasks and reassigned tasks. The due date is auto calculated based on the SLA during task creation. When multiple SLA’s are available, ICI considers the lower level first. The field Is Overdue filters tasks so that you can check for ones that are overdue. If ICI does not find a Due Date or Time, then those fields do not display any value.
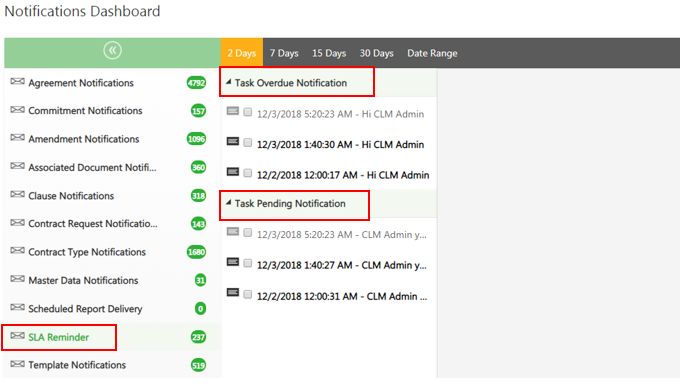
Clicking the Notifications tile on the Dashboard opens the Notifications Dashboard. You can create an SLA Reminder in the Notifications Dashboard. This can be customized as per your requirements. In the example below, the SLA Reminder is created for overdue tasks and pending tasks.
The user gets an email notification daily for overdue and pending tasks defined in the SLA till the task is completed. The ICI user interface will also display the list of tasks overdue or pending in the respective sections – Task Overdue Notification and Task Pending Notification.
You can set up a reminder for pending tasks by entering the days when you want the first reminder till the task is completed to ensure compliance with the organization’s needs.
If the First Reminder Starts is 2 days, then the reminder notification for that task will be sent 2 days prior to the due date. For example, you enter that the First Reminder Starts as 2 days on December 07, 2018, then the first reminder and notification for actions pending will first be sent on December 05, 2018 till December 07, 2018 and will be listed in the Tasks Pending Notifications section. On December 08, 2018, when the due date is crossed, then a reminder and the overdue notification will be sent daily till the task is fulfilled and the task will then be listed in the Task Overdue Notification section. This notification will be sent daily till it is fulfilled.
You can delete a single record from the Grid list. To delete a record from the list:
1. Select an entity to delete from the Select Entity drop-down list.
2. Click the Delete icon next to the entity you want to delete. This opens a window to confirm you want to delete the record.
3. Click Ok if you want to delete the record. An SLA Mapping Deleted Successfully! message is displayed.
You can edit a single record from the Grid list.
To edit a record from the list:
1. Select an entity to edit from the Select Entity drop-down list.
2. Click the Edit icon next to the entity you want to edit. This opens the Edit SLA window. The Entity Name and the Select Action fields are auto populated.
3. Edit the values in the SLA (days) or/and First Reminder Starts (days) fields.
Related Topics: Agreement Management | Managing Organization | Managing Users | Managing Security Groups | Application Settings | Notification Settings | Currencies | Reasons | Search Sync | Legacy Upload |

