Contents
Managing Security Groups
A security group in ICI is a group of users that have privileged permissions to access and manage entities in ICI. These entities can include Agreements, Contract Types, Templates, Signatories, Teams, and so on. A security group can have no permission at all or have the rights to update or only view the entity details.
ICI allows you to:
- Search security groups
- Create a security group
- View/edit a security group
- Delete security groups
Each of these operations are explained in the following sections.
Default Security Groups
- Default: This is the only seeded security group available in ICI when an instance is deployed for the first time. All users in the instance are part of this default group.
Apart from this, as many security groups as required can be created on an instance. For example “External Users with Login”, “Legal Group”, “Extended Security Group” and so on for the respective user types.
Search a Security Group
In ICI, you can search security groups to view security groups and view details of each group individually. You can use various options, including the dynamic search feature, multiple filters and custom keywords to search the desired security group.
To search Security Group, do the following:
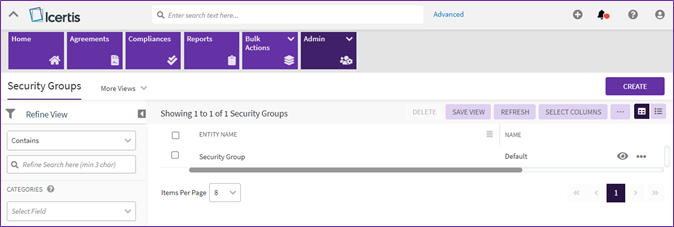
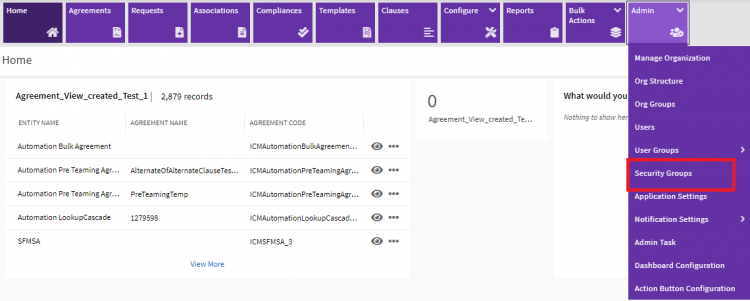
1. Click the “Admin” > “Security Groups” on the “Home” page. The Security Groups index page appears.
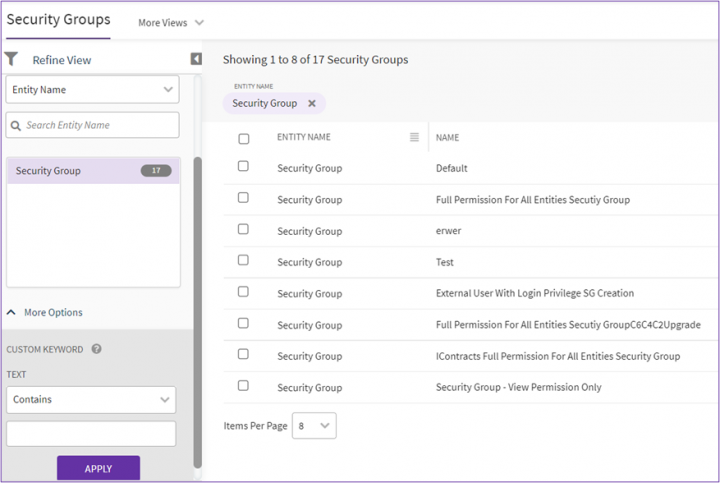
2. On the Security Groups index page, you can search for a specific security group using any of the following options:
- Click the Select Field list under Search For, and then select an appropriate item. Search results relevant to that item are displayed with a number in the bracket.
The number denotes the number of security groups that meet the search criteria. - Click the box to select a specific item. A list of security groups relevant to the item is displayed.
- Type relevant keywords in the Custom Keyword box and click Apply to narrow your search further.
Alternatively, type the keywords in the box provided. A list of relevant security groups is displayed.
| Field | Action |
|---|---|
| "..." | Type the search term in double quotation marks. It shows existing security groups that include the exact search term. |
| *...* | Type the search term in star characters. It shows existing security groups that include the exact search term. |
| *... | Prefix * to the search term. It shows existing security groups that end with this term. |
| ...* | Suffix * to the search term. It shows existing security groups that start with this term. |
Viewing the saved search terms
View your saved search terms with the following:
- In the More Views dropdown, select your saved search, and click the Add to Favorite to mark the search term as favorite.
- You can find your marked favorites below the tiles. For example, “Security Groups for West Region".
Create a Security Group
You can create a group of users and assign specific privileges to the group. You can provide access to various KPIs and reports.
You can also grant view, manage privileges to various entities in ICI.
To create a Security group:
1. Click the "Admin" > "Security Groups" on the "Home" page. The Security Groups page appears.
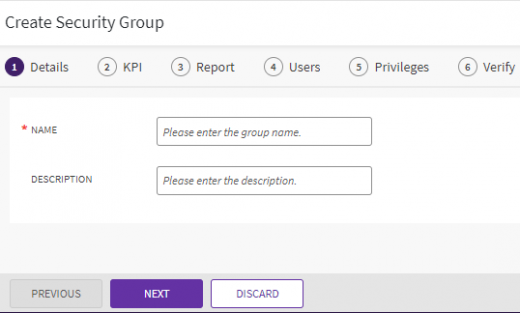
2. Click the "Create" tile. The Create Security Group page is displayed. The Create Security Group page is displayed. The page has the following tabs where you enter information required to create a security group:
- Details
- KPI
- Report
- Users
- Privileges
- Verify
3. The Details tab is open by default on the Create Security Group page. Enter the “Name” and “Description” details for the security group.
4. Click Next. The KPI tab opens.
5. The KPI tab displays a list of key performance indicators that are configured in ICI. You can select the KPIs that the security group can access based on the following options:
- View: the security group can view the respective KPI
- None: the security group does not have access to the respective KPI
6. Click Next. The Report tab opens.
7. The Report tab displays a list of platform (SQL Server Reporting Services based) as well as platform analytics (Power BI based) reports that are configured in ICI. You can select the reports of KPI that security group can access based on the following options:
- Manage: the security group can open the report and take required actions
- View: the security group can view report of the respective KPI
- None: the security group does not have access to report of the respective KPI
8. Click Next. The Users tab opens.
9. For a security group that you are newly creating, you can add users who can be a part of that security group.
i. Click “Add User/User Group”. The Add User/User Group drawer opens.
ii. Select the users/user group from the displayed list.
iii. Click Add. The selected users are added to the Security Group.
10. Click Next. The Privileges tab opens.
11. The Privileges tab shows a list of privileges that the users in the security group can have access to. Privileges allows access to various ICI entities such as Agreements, Contract Types, Templates, Signatories, Teams, and so on.
You can choose from the following actions:
- Manage: the security group has complete read and write access to the entity. For example, if you select “Manage” for Clause entity then the users in the security group can access and make changes to the Clause.
- View: the security group can only view details of the entity. For example, if you select “View” for Agreement entity then the users in the security group can view the Agreement details.
- None: the security group does not have access to a particular entity.
Note: For a list of privileges available in ICI, refer Default Privileges of a Security Group.
12. Click Next. The Verify tab opens.
13. Check the details entered or selected in each tab. Use the “Previous” and “Next” buttons to navigate between the tabs. After checking all the details, click “Save” to complete the security group creation process.
Edit a Security Group
You can edit a security group to make changes and update the details of that security group.
To edit a security group, do the following:
1. Click the “Admin” > “Security Groups” on the “Home” page. The Security Groups page opens that displays a list of existing security groups.
2. Click “View Details” (eye icon or three dots icon) to open the details page of the required group.
3. Click “Edit” on the details page. The Edit Security Group page opens.
4. Follow steps 3 through 13 explained in the “Create a Security Group” section to understand various tabs and related fields to do the relevant changes.
Note: In the Users tab, you can see a “Remove” button under each user associated with the security group. Use the option to delete that user from the group.
5. Click “Update” after required fields are updated.
Delete a Security Group
To delete a security group, do the following:
1. Click the “Admin” > "Security Groups” on the "Home" page. The Security Groups page opens that displays a list of existing security groups.
2. Select the desired security group (you can select more than one group also), and then click “Delete”.
3. A confirmation message popup is displayed. Click “Yes” to complete the deletion process.
Default Privileges of a Security Group
Privileges are assigned in a security group based on the entities present in the ICI instance. Access can be given to various contract types (including agreement contract types), tiles, and so on.
Access to various reports is also provided through Security Groups, where “View”, “Manage” or “None” access can be provided on the reports for that particular group. For example, only a security group having managers/approvers can be given access to the “Agreements Pending Approval” report.
The number of security group privileges in ICI depends on the entities created on that instance and can vary. The default entities for which privileges are provided are:
- Add/Remove Team: Enables user to add a team to or remove a team from any entity record such as an agreement. Users can only be assigned “Manage” or “None” access.
- Advanced Analytics: Enables users to access advanced analytics functionalities such as viewing of analytics dashboards, creation of a new report and natural language data querying.
- Agreement: Enables user to view or create and edit agreements as per the assigned privileges.
- AI Studio: Enables licensed users to access AI Studio apps and functionalities.
- Alias Master: Enables users with “View” access to view records and those with “Manage” access to create, edit or delete records.
- Associated Document: Enables users with “View” access to view associated documents and those with “Manage” access to create, edit or delete them.
- Clause: Enables user to view or create and edit clauses as per the assigned privileges.
- Contract Request: Enables user to view or create and edit contract requests as per the assigned privileges.
- Contract Type: Enables user to view or create and edit contract types as per the assigned privileges.
- Cascade Team: Enables users to view (use) or create and edit cascade teams as per the assigned privileges.
- Default Search Column: Displays the default search column on entity index pages.
- Enable/Disable Team: Enables user to enable or disable a created team of users, on the Details page for any record such as an agreement, request and so on. Only “Manage” or “None” access can be provided here.
- Attributes: Enables users to view (use) or create and edit attributes as per the assigned privileges.
- Linkage Type Master: Enables users to view or create and edit linkage types. Linkage types can be peer, parent-child as well as other user-defined linkage types.
- Masterdata: Enables user to view (use) or create and edit masterdata such as Country Masterdata, Vendor Masterdata and so on.
- Promote Configuration: Enables users to use or modify Promote Configurations (P2P) Tool for moving ICI configurations from source environment to target environment.
- Rules: Enables users to use or modify rules configured for various actions.
- Self Service: Enables users to use or modify self-serve configuration tools such as the Translations Editor, Search Sync, Configuration Key Editor, among others. Users can only be assigned “Manage” or “None” access.
- Template: Enables users to use or create and modify templates.
- Admin Task: Enables administrators to use or modify self-serve configuration tools such as the Search Sync, Legacy Upload, Data Management functionalities among others. Administrators have “Manage” access by default.
- Bulk Action: Enables administrators to take bulk actions to create multiple records such as users, agreements and so on.
By default, only the privileges for Agreement and Admin Task are set to “Manage” for an administrator. All other privileges are set to “None” access. Only an administrator can edit the access privileges for the entities from “None” to “View”/“Manage”.
Privileges can also be provided for other entities created across the instance such as any new agreement contract types, masterdata such as country or vendor masterdata, associated document contract types, cross-reference mappings for integrations, and so on. Hence, an environment may have several additional entity names along with the ones listed above.
Related Topics: Agreement Management | Managing Organization | Managing Users | Managing User Groups | Application Settings | Notification Settings | Currencies | Reasons | Search Sync | Legacy Upload |


