Contents
Masterdata
Creating Masterdata
With ICI, you can create and use the Masterdata for your Agreements.
To create Masterdata:
1. Click "Home"> "Configure"> "Masterdata". The "Masterdata" page opens.
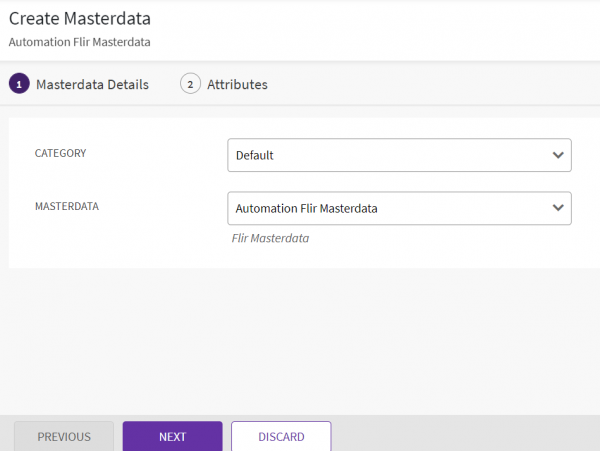
2. Click "Create" on the "Masterdata" page. The "Create Masterdata" page opens.
The Create Masterdata page consists of 2 sections:
-
- Masterdata details
-
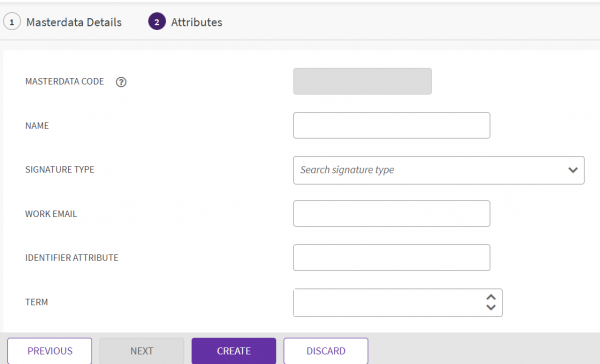
- Attributes
Masterdata Details
The Masterdata details section consists of three fields:
- Category: Select the appropriate category.
- Masterdata: Select the appropriate Masterdata category.
- Masterdata Description: This field facilitates users to select the desired Masterdata Contract Type.
3. Click "Next". The "Attribute" tab opens.
Attributes
On the Attributes tab, you add different attributes to the masterdata:
- Name: Type the name of the masterdata.
- Effective Date: Select an appropriate effective date.
- Expiry Date: Select an appropriate expiry date.
- Masterdata Code: This is a system generated code.
- Party Address: Type the party address.
- Party Name: Type the party name.
- Company Address: Select an appropriate category from list.
- Select File: Upload the Company Contract Document.
- Company Creation date: Select an appropriate company creation date.
- Company Details: Type appropriate company details.
- Company Email: Type the official company email address.
- Company Phone Number: Select an appropriate category from list.
- Company Profit: Select an appropriate category from list.
- Company Project User: Click the "Add User" icon. The "Select User" box opens. Under "Select User", select an appropriate project user. Alternatively, in the "Search User" box, type the name of the desired user, and click the Search icon. Use the scroll arrows Scroll to scroll through users. Click "Add" to add the user.
- Company URL: Type the official company URL. In the Link Text box, type free text.
- Contract Description: Type a description for the Contract. This field helps users to select the desired Contract Type.
- Contract Value: Select an appropriate category and then select appropriate currency from the Select Currency list.
4. Click "CREATE". If the approval workflow is enabled in the Masterdata contract type for this instance, then after saving the Attributes page, "Masterdata" details page opens.
5. Click "Team" in the left pane.
6. After you click "Team" it will display the rule based Approvers for this instance. Now click "Send For Approval" to send it further for the approval.
7. In case approval workflow is not enabled for this instance, it will simply create the Masterdata.
Applying filters on Masterdata records
You can apply multiple filters while referencing values from any master records. You can predefine filters or apply them based on the attribute values for the selected attributes while entering the details.
Users can now:
- Define UI based configuration for multiple static and dynamic filters for the referred masterdata
- Filter masterdata records directly in the drop-downs as well as the popup, based on the predefined configured static filters while working with agreements/amendments
- Filter masterdata records directly in the drop-downs as well as the popup, based on the predefined dynamic filters as the user keys in the values for the selected attributes marked as filters while working with agreements/amendments
Configuring Static and Dynamic filters on Masterdata records
To configure static filters:
Let us consider an example where Automation Country Master is a Masterdata Contract Type having attributes such as Country Name, Country Name String, Identifier Attribute and Name for Cascade and Lookup. We are configuring a static filter where Country Name String attribute must not contain the country West Indies.
1. Click the "Add Filter Configuration" icon. The "Filter Configuration" window opens for the master record "Automation Country Master".
2. Toggle "On"for the"Is Mandatory"field.
3. Select "Must Not" from the "Operator Type" drop-down list. The Country Name String attribute must not contain the country West Indies.
4. Select Country NameString from the "Attributes" drop-down list. The Country Name Stringattribute displays the names of countries.
5. Select the checkbox for the country. For example, the West Indies.
6. Click "Apply"to view the output on the right side of the filter.
7. Click "Save". The Attribute updated successfully window opens.
8. Enter the details in the remaining Association, Display Preference, Team, and Verify tabs to publish the Contract Type. Alternatively, you can edit an already existing Contract Type to add the filter to its existing attribute.
A Static filter is configured on the Masterdata record where Country Name String attribute must not contain the country West Indies.
To Configure Dynamic filters on Masterdata records:
1. Click the "Add Filter Configuration" icon. The "Filter Configuration" window opens for the master record Automation Country Master.
2. Toggle "On" for the "Is Dynamic" field.
3. Select "Must" from the "Operator Type" drop-down list.
4. Select Country Name String from the Contract Type Attribute drop-down list.
5. Select Country Name from the Linked To drop-down list.
6. Click "Apply".
7. Click "Save". The "Attribute updated successfully" window opens.
8. Enter the details in the remaining Association, Display Preference, Team, and Verify tabs to publish the Contract Type. Alternatively, you can edit an already existing Contract Type to add a filter to its existing attribute.
A Dynamic filter is configured where Country Name String attribute value is dynamically linked to the attribute value of Country Name.
For more information about Static and Dynamic Filters at Agreement level, see Adding Static and Dynamic Filters'.
Defining IN operator when applying lookup filters
In ICI, the configurator can filter the lookup masterdata table with Must and Must Not conditions, to achieve necessary business scenarios, while configuring a lookup attribute on contract types.
ICI provides the ability to configure a lookup attribute using the IN filter operator, and display selected multiple values, by referencing multiple values on another lookup master data attribute.
Configurators can now:
- Use the "IN" operator in the lookup filter attribute on agreement contract types.
- View the applied filter on the "Attributes" page on the UI for the selected attribute.
Standard ICI users can view only selective values in the lookup attribute as per the referenced value in another attribute.
Let us consider an example of masterdata with attributes- Automation Region Master (Region ID, Region Name, and Short Name), Sales Type Master (Sale Type, Sale Region) and Automation Country Master (Region Sale Type, Country Name String).
A multi-select attribute Region Sale Type in Automation Country Master looks up to an attribute Sale Type in the Sales Type Master. And a multi-select attribute Sale Region in Sales Type Master looks up to an attribute Region Name in the Automation Region Master.
Users can display values from the Automation Country Master based on the values selected from the Sales Type Master which looks up to the Automation Region Master, using IN operator in Dynamic/Static filters.
Users can add attributes and configure lookups and filters while creating a new contract type or editing an existing contract Type.
To configure masterdata Lookups in agreement contract type:
1. Click "Configure" > "Contract Types">"Create". The "Create Contract Type" page opens.
2. Select "Agreement" and click "Next". The "Create Contract Type" page opens.
3. Enter Contract Type Name. For example, Master Services Agreement.
4. Click Next. The Attributes tab opens.
5. Add attribute from "Available Attribute" sections to "Selected Attribute" section using action arrows. For example, Sale Country. The Edit Attribute section for the selected attribute opens
6. Toggle the "Is Lookup" field to On. The Lookup section opens.
7. Select a Contract Type for the attribute to look up to in a Select Contract Type field.
8. Select an attribute from the selected masterdata to look up to in a Select Attribute field.
Similarly, configure attribute Sale Type looking up to the attribute Sale Type in the Sale Type Master, and the attribute Sale Region looking up to the attribute Short Name in the Automation Region Master.
To configure static lookup filters with IN operator:
1. Click "Add Filter Configuration" icon next to the Select Contract Type field. The Filter Configuration window for the selected contract type, here "Automation Country Master", opens.
2. Toggle the "Is Dynamic" field to Off.
3. Toggle the "Is Mandatory" field to "On" if required.
4. Select "IN" from the Operator Type drop-down if you want to apply lookup filter on a multi-select choice/lookup type attribute.
5. Select the Attributes from the masterdata to set up the filter upon. For example, Region Sale Type.
6. Enter values in a comma separated format in the field. For example, MPX, Reseller.
8. Close the window. The Attributes tab opens again.
To configure dynamic lookup filters with IN operator:
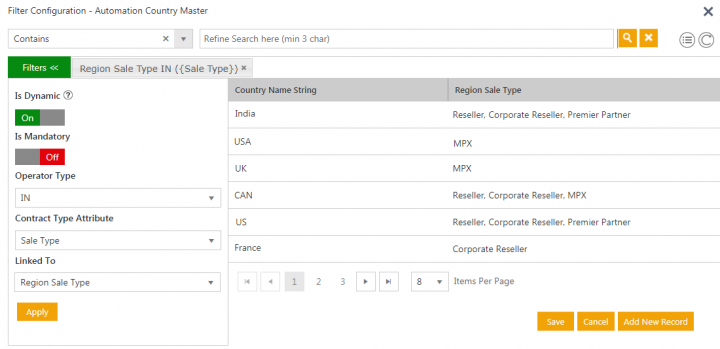
1. Click "Add Filter Configuration" icon next to the Select Contract Type field. The Filter Configuration window for the selected contract type, here Automation Country Master, opens.
2. Toggle the "Is Dynamic" field to "On".
3. Toggle the "Is Mandatory" field "On", if required.
4. Select "IN" from the "Operator Type" drop-down if you want to apply lookup filter on a multi-select choice/lookup type attribute.
5. Select the Contract Type Attribute from the current contract type. For example, Sale Type from Master Services Agreement.
6. Select Linked To attribute from the masterdata to set up the filter upon. For example, Region Sale Type.
The filter will display records where Region Sale Type values are in the selected Contract Type Attribute- Sale Type.
7. Close the window. The "Attributes" tab opens again.
Similarly, set up the filters for the attribute Sale Type with Contract Type Attributeas Sale Region and Linked To as Sale Region with the Operator Type as IN.
The Filter will display values in the Sale Country field for Master Services Agreement where attribute Sale Region’s values from Sale Type Master are in the selected current Contract Type Attribute- Sale Type values.
8.. Click "Apply".
9. Close the window. The "Attributes" tab opens again.
10.Click "Save". The "Attribute" will be saved.
11. Click Next. The "Association" tab opens.
12. Enter the details in the Association, Display Preference, and Team tabs and verify the entered details on the Verify tab.
13. Click Update and then publish and approve the Contract Type following standard ICI workflows.
Using IN operator in filters during Agreement creation
To add filters:
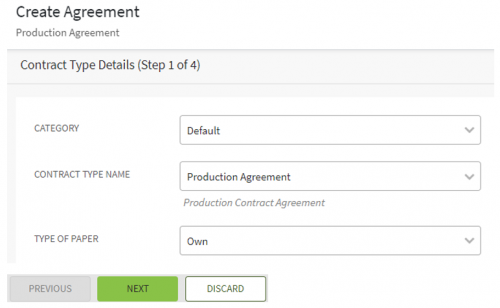
1. Click the "Agreements" > "Create". The "Create Agreement" page opens.
2. Select the "Contract Type Name". For example, Master Services Agreement.
3. Select Type Of Paper. For example, "Own".
4. Click "Next". The "Attributes" tab opens.
5. Select the "Sale Region". For example, US-W.
6. Select the "Sale Type". For example, MPX and Reseller. The Sale Type will display values based on the selected value in the "Sale Region" field.
7. Click the "Filtered Lookup" Search or Add New Record icon next to Sale Type field. The "Lookup Search" window for Sale Type opens.
8. Close the window. The "Attributes" page opens again.
10. Click the "Filtered Lookup Search" or "Add New Record" icon next to "Sale Country" field. The "Lookup Search" window for "Sale Country" opens.
The "Lookup Search" window displays the records based on the applied filter with "IN" operator at contract type level. Users can remove the existing non-mandatory filters and lookup by applying different filters.
11. Close the window. The "Attributes" page opens again.
12. Click "Next". The "Select Template" page opens.
13. Select the Template and click "Next". The "Verify" page opens.
14. Verify the details and click "Create". The agreement is created.
Editing Masterdata
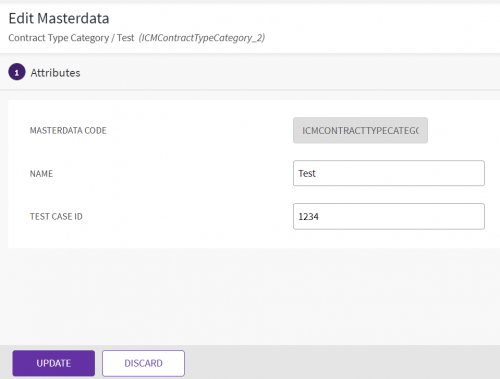
In ICI, you can create and edit Masterdata for your Agreements. You can edit the Masterdata to update any information which was either not provided or was not correct.
To edit the Masterdata:
1. Click "Configure" tile on the "Home" page and then click "Masterdata". The "Masterdata" page opens.
2. Click "View Details" next to the Masterdata that you want to edit.The Masterdata "Details" page opens.
3. Click Edit. The "Edit Masterdata" page opens.
4. Edit the required information and click "Update".
6. Click "Deactivate" on Masterdata "Details" page to deactivate the Masterdata. The deactivated Masterdata cannot be used for future transactions, though it remains searchable and visible in the Masterdata list.
When you click "Update", the modifications will be saved.
Searching Masterdata
To search the masterdata:
1. Click "Configure" tile on the "Home" page and then click "Masterdata". The "Masterdata" page opens.
2. Under "Search For", click "Select Field" list.
3. Select an appropriate field from the list. The number in the bracket denotes the number of masterdata records that meet the search criteria. You can also select multiple options.To narrow down your search, enter free text in the "Custom Keyword" text box, and then click "Apply".
4. Alternatively, type "keywords" in the "search" box provided above the list of existing masterdata records. A list of relevant master data records is displayed.
You can enhance your search by using any of the following methods:
| Field | Action |
|---|---|
| *...* | Type a search term in between the star characters. It shows existing items which include the respective search term. |
| *... | Prefix * to a search term. It shows existing items which end with this term. |
| ...* | Suffix * to a search term. It shows existing items which start with this term. |
| "..." | Type a search term in double quotes. It shows existing items which include the search term. |
| *...(space)... | Type multiple search terms with a space in between. It shows existing items which include the search terms. |
You can also view your saved search terms. In the More Searches box, select your saved search, and click the Add to Favorites icon to mark the search term as favorite.
You can find your marked favorites below the tiles.
Related Topics: Agreement Management | Configuration

