Assigning an Executed Agreement
In ICI, authorized users can assign executed Agreements to other parties to fulfill obligations and responsibilities as per the terms and conditions. The process of assignment can be initiated to change the parties (legal entities) or some other attributes of the main agreement, based on the business requirements. Authorized users can initiate an Assignment creation on an executed Agreement, take the Agreement through the workflow and negotiation process, and execute the same through the signature process.
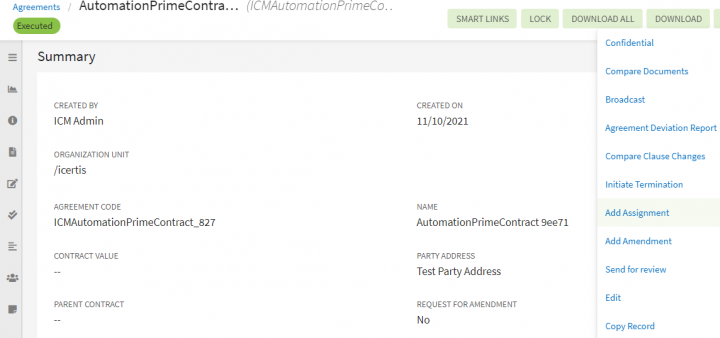
Users with Manage privileges on the Masterdata can set up the Contract Types that need to be allowed for creating an Assignment. ICI displays Add Assignmentalong with other actions to which the user has role-action mapping privileges (as part of a Team). When the Assignment is initiated, user can select the Assignment Contract Type from the drop-down as per the mapping done through Masterdata configuration. After the Assignment is executed, the scheduler supersedes the values from the Assignment to the parent Agreement (based on the Is Supersedable by Assignments value of the attribute set in the Contract Type) on ICI Assignment date and the Assignment moves to the Completed state.
There can be multiple assignments in the lifecycle of a particular Agreement. Search and Notifications are applicable to Assignments as well. You can search or generate a Report on the metadata of the main Agreement before and after the Assignment effective date.
Adding an Assignment
To add an Assignment to an Excecuted Agreement:
1. Click "Add Assignment" on the Agreement Details page of the Agreement that is in "Executed" state. Other actions will be displayed based on the role-action mapping privileges as part of the team. This initiates the creation of Assignment Agreement.
2. Select the "Contract Type Category", "Contract Type" and "Type of Paper". (If there are other Assignments (as an Association) on the Agreement that are in a status prior to Executed, a warning message will be displayed allowing you to either proceed with a new Assignment creation or go back to the main Agreement. If there are no Association Contract Types available for Assignment, the Contract Type drop-down will be blank and you will not be able to proceed.)
3. Click "Next"to navigate to the "Attributes" page where ICI inherits all the values for attributes that are common to the parent executed agreement and the current Contract Type. You can edit any of the attribute values, but it is imperative to define the Assignment Date. Only the Attributes having Is Supersedable by Assignments flagged True will be superseded.
4. Click "Next"to navigate to the next page. Based upon the Type Of Paper selected and conditions for validations, you will navigate to either the Template Selection page or the Verifypage.
5. Click "Create" or "Create and Publish"to create the Assignment Agreement. On creating the Assignment, you will see the linking between the parent Agreement and the Assignment.
6. Click the link to navigate to the parent Agreement. The grid displays the Assignment One count as 1. On clicking it, a list of Assignments will be displayed. ICI sets up a peer-to-peer association between the main Agreement and the Assignment Agreement and displays the same under the Assignment Contract Type in the Associations tab for reference.
7. Clicking the "View Details" button allows you to navigate to the Assignment. The Assignment is now in the "Draft" state. Perform the required action to take it to the Executed state. A message informing you that the Assignment will move to the next possible state will be displayed.
8. Select "Yes". The Assignment is now in the "Executed" state. The parent Agreement also needs to be in "Executed" state. The status changes to "Assignment Completed".
The status can be viewed on the History tab as well. The status remains the same for the parent Agreement. However, the History tab displays that the Agreement Assignment is completed and prior to that the Attributes were superseded.
9. To add more assignments, click the "Add Assignment" button. A message informing you that an Assignment is already in progress will be displayed.
Related Topics: Agreement Details Page |
